How to Cure Heirloom Garlic for Long-Term Storage
Table of Contents
When and How to Harvest Your Heirloom Garlic
Recognizing harvest-ready signs
Digging and handling bulbs without damage
Preparing Bulbs and Removing Excess Soil
Gentle cleaning techniques
Trimming roots and stalks
How Long to Cure Garlic: Timeline and Phases
Creating Ideal Garlic Curing Conditions
Temperature, humidity, and ventilation requirements
Choosing racks, screens, or braids
How to Tell When Garlic Is Cured and Ready
Testing skin papery texture and bulb firmness
How to Store Cured Garlic for Maximum Shelf Life
Storage containers and environmental conditions
Monitoring for sprouting, mold, and rot
Troubleshooting Common Curing Problems
Preventing mold, uneven drying, and sprouting
Heirloom Garlic Varieties and Their Curing Needs
Hardneck versus softneck cultivars
Frequently Asked Questions
Last Updated: October 20, 2026
When and How to Harvest Your Heirloom Garlic
Timing your heirloom garlic harvest correctly is the foundation of how to cure heirloom garlic successfully. At Central Or Garlic Co, we've learned that rushing this step leads to weak bulbs and poor storage life. The goal is to catch your garlic at peak maturity, when the bulbs have fully formed but before they begin to break apart naturally.
Recognizing harvest-ready signs
Your garlic is ready to harvest when the lower leaves turn brown and dry. Count up from the bottom: typically, you'll see about half the leaves have yellowed or browned. The upper leaves remain green. This usually happens in late spring or early summer, depending on your planting date.
Don't wait for all the leaves to dry completely. That's too late. Pull one bulb early and check it. The cloves should be plump and well-separated inside the papery skin. If they're still soft or clustered tightly, wait another week.
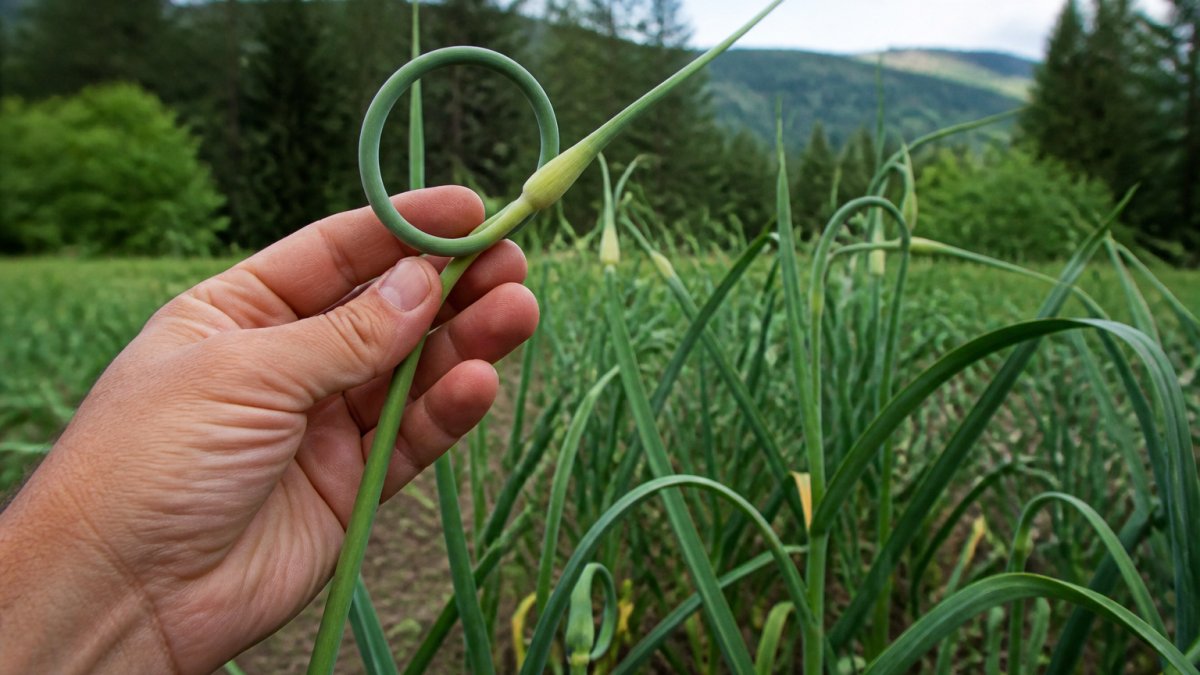
Hardneck varieties (like the German Red and Chesnok Red strains we preserve) show another signal: the scape, or flower stalk, curls into a loop and then straightens. Softneck varieties don't produce scapes, so rely on the leaf-browning method instead.
Digging and handling bulbs without damage
Use a garden fork, not a shovel. Insert it deep into the soil about 6 inches away from the plant. Gently loosen the earth around the bulb without jabbing it. The bulb itself is fragile at harvest time.
Lift the entire plant carefully. Shake off excess soil by hand. Don't wash the bulbs. Water damages the papery outer skins and invites rot during curing.
Leave the roots and stalks attached. You'll trim them later. Handle bulbs gently, bruises and cuts become entry points for mold and bacteria during storage.
Preparing Bulbs and Removing Excess Soil
Once harvested, your garlic needs gentle preparation before it enters the curing phase. This step protects the bulb and sets up proper drying conditions.
Gentle cleaning techniques
Brush away loose soil with a soft cloth or your hands. Never use water at this stage. Excess moisture trapped under the papery skin causes rot.
If soil is caked on, let the bulbs dry in a warm spot for two or three days. The soil will flake off easily once it's dry. Then brush again.
Inspect each bulb for damage. Discard any with deep cuts, soft spots, or visible bruising. These won't store well and may contaminate nearby bulbs with mold.
Trimming roots and stalks
Once the bulbs are clean and dry, trim the roots. Cut them flush to the basal plate (the flat bottom where roots attach). Use clean scissors or pruning shears.
Trim the stalk to about one inch above the bulb. For braiding varieties, leave 2-3 inches if you plan to braid them later. Cut at an angle so water doesn't pool on the cut surface.
Some growers trim everything short right away. Others leave stalks longer during early curing, then trim before storage. Both methods work. Choose what feels manageable for your setup.
How Long to Cure Garlic: Timeline and Phases
Curing garlic is a gradual drying process that typically takes 2-4 weeks. This timeline varies based on your climate, humidity, and airflow. Understanding the phases helps you monitor progress without guessing.
Week 1: The outer skins begin to papery and crack slightly. The stalk starts to dry and shrink. Bulbs still feel slightly soft if you squeeze gently.
Week 2: More of the outer layers dry and separate. The stalk becomes brittle. Bulbs feel firmer but not yet hard.
Week 3-4: The outer skins are fully papery and white or tan. The stalk is completely dry and brittle. Bulbs feel solid when squeezed.
In humid climates, curing may take 5-6 weeks. In dry climates, it might finish in 2-3 weeks. Don't rush. Undercured garlic won't store well. Properly cured garlic keeps for months.
Creating Ideal Garlic Curing Conditions
The environment where you cure garlic determines success. Temperature, humidity, airflow, and light all matter. Get these right, and your bulbs will cure evenly. Get them wrong, and you'll face mold, uneven drying, or sprouting.
Temperature, humidity, and ventilation requirements
Aim for temperatures between 65-75°F during curing. Cooler is fine; warmer speeds drying but risks damaging delicate skins. Avoid temperatures above 85°F.
Humidity should be low. Ideally, 40-50% relative humidity. High humidity (above 70%) encourages mold. If your curing space is damp, add a fan or open windows to increase airflow.
Ventilation is critical. Air must move around every bulb. Stagnant air traps moisture and creates pockets where mold thrives. A gentle fan helps, but natural air circulation works too.
Shade is essential. Direct sunlight can scald the outer skins, turning them brown or papery too quickly. This damages them and creates cracks where rot enters.

Choosing racks, screens, or braids
Three main methods work well. Choose based on your space and preference.
Racks or screens: Lay bulbs in a single layer on clean, dry racks or window screens. This allows air to circulate above and below. Check them every few days and turn bulbs so they dry evenly. This method is simple and effective.
Bunches: Tie 6-8 garlic plants together at the base of the stalk. Hang them upside down from rafters or hooks. This saves space and looks attractive. Air circulates around the hanging bunches naturally.
Braids: For softneck varieties, braid the dried stalks together into long strands. Hang the braids in a cool, dry place. This is traditional and space-efficient. It also makes storage and display elegant.
All three methods work. Pick what fits your space and what you'll enjoy maintaining.
How to Tell When Garlic Is Cured and Ready
After 2-4 weeks, your garlic should be fully cured. But how do you know for sure? There are clear signs to look for.
Testing skin papery texture and bulb firmness
The outer skins should be completely dry and papery. They crackle when you rub them. The color is usually white, tan, or light purple, depending on variety. There should be no soft spots or damp areas.
Squeeze the bulb gently. It should feel solid and firm, like a tennis ball. If it gives under pressure, it needs more time.
The neck (where the stalk meets the bulb) should be tight and closed. Gently bend the dried stalk. It should be brittle and snap easily, not rubbery.
Peel back one layer of outer skin. The layer underneath should also be papery and dry. If it's still moist or translucent, the bulb needs more curing time.
How to Store Cured Garlic for Maximum Shelf Life
Once cured, garlic needs the right storage conditions to stay fresh for months. Temperature, humidity, and darkness are your allies here.
Storage containers and environmental conditions
Store cured garlic in a cool, dark place. Ideal temperature is 50-60°F. A basement, root cellar, or cool closet works well. Avoid the refrigerator unless you're storing cut cloves. Whole bulbs in the fridge can sprout or develop mold.
Use breathable containers: mesh bags, paper bags, or open boxes. Avoid sealed plastic containers, which trap moisture and cause rot. Garlic needs air circulation even in storage.
Keep humidity low, around 40-50%. If your storage space is damp, use a small dehumidifier or place open boxes of baking soda nearby to absorb moisture.
Darkness matters. Light triggers sprouting. Store bulbs away from windows and overhead lights.
Monitoring for sprouting, mold, and rot
Check your stored garlic every two weeks. Remove any bulbs showing soft spots, mold, or sprouting. One bad bulb can contaminate others nearby.
Sprouting happens when garlic is exposed to light or when temperatures warm above 70°F. If you see green shoots emerging from the cloves, move the bulbs to a cooler location immediately.
Mold appears as white, gray, or green fuzzy patches. It starts at the base or where cloves separate. Discard affected bulbs. Improve airflow and lower humidity in your storage space.
Rot develops as a soft, mushy texture and often smells sour or unpleasant. This usually means the bulb wasn't fully cured or was exposed to excess moisture. Remove it and adjust your storage conditions.
When you cure heirloom garlic properly and store it correctly, it lasts 4-6 months, sometimes longer.
Troubleshooting Common Curing Problems
Even experienced growers face challenges. Here's how to handle the most common ones.
Preventing mold, uneven drying, and sprouting
Mold appears during curing: This means humidity is too high or airflow is too low. Increase ventilation immediately. Open windows, run a fan, or move bulbs to a drier space.
Bulbs are drying unevenly: Some bulbs look papery while others still feel soft. This happens when bulbs are stacked too closely or airflow is blocked. Spread them out more.
Necks aren't tightening: The neck stays soft and open instead of closing. This usually means the bulb wasn't fully mature at harvest or curing time was too short.
Sprouting in storage: Green shoots appear inside stored bulbs. This means your storage temperature is too warm or there's too much light. Move bulbs to a cooler, darker location immediately.
Cloves separating inside the bulb: The cloves feel loose and rattle when you shake the bulb. This is usually a sign of age or improper storage humidity.
Heirloom Garlic Varieties and Their Curing Needs
Different heirloom varieties have slightly different curing requirements. Understanding these differences helps you optimize your process.
Hardneck versus softneck cultivars
Hardneck varieties produce a stiff central stalk and have larger individual cloves.
Hardneck garlic is prized for its bold taste and complexity. The thinner skins mean you must handle them gently during curing.
Softneck varieties have no central stalk and many small cloves clustered together. They cure more slowly, often taking 3-4 weeks.
Softneck garlic stores longer than hardneck, sometimes 6-8 months or more. It's ideal for braiding because the stalks are flexible even when dried.
Both types benefit from the same basic curing principles: cool temperature, low humidity, good airflow, and shade. The main difference is timing.
Growing and curing heirloom garlic requires patience and attention to detail. The process isn't complicated, but it demands care at every stage.
Central Or Garlic Co has spent years perfecting garlic cultivation using soil-first, organic methods that produce bulbs with rich, complex flavors.
Frequently Asked Questions
How long does heirloom garlic need to cure?
Heirloom garlic typically requires 2 to 4 weeks to cure fully, though some varieties may need up to 6 weeks depending on bulb size and environmental conditions. The process is complete when the outer skins turn papery, the stalks dry completely, and the bulb feels firm when squeezed gently. Check bulbs weekly after the 2-week mark to monitor progress. Softneck varieties generally cure more slowly than hardneck types.
What temperature and humidity should you maintain while curing garlic?
Ideal garlic curing conditions are 65-75°F with 40-50% humidity and strong air circulation. Temperatures above 80°F accelerate the curing process but can compromise flavor and storage life, while temperatures below 60°F slow drying significantly. Humidity that's too high (above 70%) encourages mold and rot; too low (below 40%) causes outer skins to crack. Use a fan to ensure consistent air movement around the bulbs, and avoid direct sunlight, which can cause sun scald on exposed cloves.
How do you know when garlic is fully cured and ready to store?
Garlic is fully cured when the outer papery skins are completely dry and papery to the touch, the stalk snaps cleanly when bent, and the bulb feels firm and heavy for its size. Cut open one test bulb to check that the cloves have separated slightly from each other and the interior skins are dry. The roots should be completely withered and dark. If the stalk still bends without breaking or the bulb feels soft, continue curing for another week and retest.
How should cured garlic be stored for the longest shelf life?
Store cured garlic in a cool, dark, dry place with temperatures between 50-65°F and humidity below 60%. Use mesh bags, wooden crates, or cardboard boxes that allow air circulation, and avoid sealed plastic containers that trap moisture and encourage sprouting or rot. Keep bulbs in single layers or loosely piled, and check monthly for signs of sprouting, soft spots, or mold. Properly cured and stored heirloom garlic can last 4-8 months.
Get Started Today

Comments